
From Egg to Chick: How we Incubate
- Blue Barn Farm
- Apr 6, 2022
- 7 min read

I am by no means a professional, nor do I claim to be when it comes to chickens, or other farm animals for that matter. I have read countless articles on incubating and hatching eggs, some with very reliable and dependable information. Others with very questionable information. But hey! That’s all part of the process! We live and we learn from our mistakes and try to do better the next time. This article is about how we incubate and raise chicks from day one of incubation to the day they hatch!
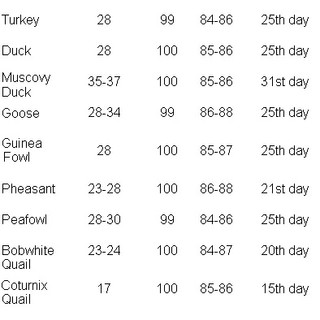
Before even deciding on incubating eggs we highly recommend to be sure you have a rooster among your hens. You need a rooster to have fertile eggs after all. There is no guarantee your rooster is mounting all your hens as most pick favorites. You can try to keep an eye on what girls get mounted or just try your luck by picking out the best eggs and setting them to the side to incubate. After you collect however many eggs your incubator can fit (or how ever many you’d like to start your incubation journey) store the eggs in a cool place kept at a steady 55-60 degrees Fahrenheit (not in the fridge it’s too cold!) for 7 to 10 days, or just put them right into the incubator! But be sure to only put in clean and dry eggs. Don’t wash them as this removes the bloom- a protective layer surrounding the outside of the egg used to keep bacteria out. We find it’s best to get them in the incubator the sooner the better! For chicken eggs (which is what we hatch) the incubation process is 21 days. Different species of bird take a different amount of time. The chart below gives an idea of each species incubation time frame:

We highly recommend using an incubator with some automatic features like a turner, so you don’t have to manually turn the eggs a couple times a day (it is crucial the eggs are turned to ensure the developing chick does not stick to the inside surface of the shell) and a fan to eventually distribute heat distribution and air flow. Though incubators without fans work just as well in our experience. If you have an automatic turner, place the eggs pointy side down just as you would in an egg carton. If you don’t have a turner you’ll have to be sure to manually turn the eggs between 3 and 5 times a day. One way to be sure you’ve turned an egg is to mark it with an X with a pencil. Don’t use pen or sharpie as it could seep into the egg. It’s recommended that you prepare the incubator/s you plan to use up to a week prior to the eggs you plan to incubate, but we have personally been successful with preparing and setting eggs in a 24 hour period or less. I don’t recommend this unless you absolutely know what you’re doing! Before and after each hatch be sure to sanitize/wash the inside of your incubator/s with a 10% bleach solution followed by warm soapy water and a thorough rinse to ensure everything is clean for the next batch of eggs and chicks. Once the incubator is dry, turn it on and watch to be sure the temperature and humidity stay consistent for any given time. Once you determine everything is good to go, place it in an area that has a consistent temperature with no draft!

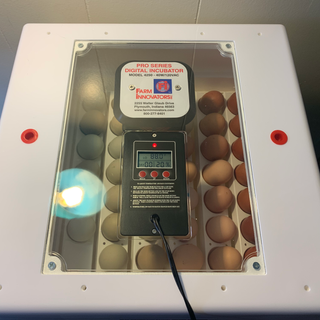


Both temperature and humidity levels are crucial during the first 17 days of hatching eggs. Optimal Temperature is 100.5 degree Fahrenheit but can fluctuate between 99 and 102. Do not allow the temperature to drop below 99 or above 102 for longer than a couple hours or you risk killing the growing embryo inside. Relative Humidity should be kept between 50 and 55 percent. Not all incubators are accurate with their temperatures so we recommend you have a secondary gauge that shows both humidity and temperature levels! This will help ensure you’re you stay in the safe range where you need to be. Some people swear by a ‘Dry Hatch’. This just means you don’t add any water to incubators resiviour for the first 18 days. I have tried this method more than once and have been successful. But I don’t do it every time. Try to refrain from candling any eggs until day 10 of incubation to ensure you don’t change the temperature or humidity too frequently. Some candle as early as day 7, but some eggs may not be developed far enough along for you to see. Bantam eggs develop rather quickly and can some see life start as early as 4 days into incubation (pictured below) At this point you should see veins starting to form and/or little blobs of chicks starting to develop. The darkest spot you see is the eyeball. Always always ALWAYS wash your hands with soap and water before and after handling eggs, or wear rubber gloves so you don’t cross contaminate with germs or your skins oils to the unborn chick.
This moment truly is the BEST feeling! Congratulations, you have created life! But we’re not done yet. You’re only a little under half way there! Some not so good news is around this time you may notice what look like a ring of red around the inside of the shell. This indicates the embryo has passed and is no longer developing. Many mistake this for a live embryo and get excited, thinking it’s still alive because the red is technically veins. Those eggs should be removed immediately in case they begin to rot and possibly explode- which I promise you you don’t want to happen 🤢 So to make this short and sweet- any dud (or dead) eggs, remove them at this point! If they have not shown signs of developing at this point they probably won’t at all. Best to continue with the remaining survivors and be happy with what you have. I promise it gets better!


By the time you reach day 18 you should raise the humidity level to 70 percent. This time is critical because too high a humidity you risk drowning the chick, too low you risk drying it out. During this time you should do one last candling to see who is still alive and dancing and remove those you believe to be dead. If you’re too nervous like myself to risk removing any, then just keep an eye on the eggs throughout the next couple days for any changes in smell, look or otherwise maybe even a chick hatching early. If any seem to be rotting, remove them immediately so the newborn chicks don’t become ill or die from the toxins and bacteria.
You can remove the automatic turner today and stop turning eggs as this day they go into lock down (day 18). Around this time you should plan to buy a bag of chick starter (if you haven’t already) and all the feeder/water/bedding equipment you might need before these chicks arrive. We have personally always used heat lamps to keep the chicks warm, it’s just easier in our opinion. We’ve heard of others using heat plates (pictured below) but I personally feel the chicks could burn themselves if they get too close to it- like when they’re old enough to get on top. It’s all up to personal preference! (This heat plate was found at Tractor Supply)


Congratulations you’ve made it to day 21- Hatch Day! Chicks typically start to hatch around today, though some are early bloomers and will arrive as early as day 18 or at late as day 25! It depends on the chick and how their development is coming along. This is the most exciting time. If you candle the egg at this time you will see what is known as the ‘internal pip’- that is when you candle an egg and see the chick has broken through the air cell in the egg and is starting its hatching journey! (First picture below) Later you may notice some cracks in the eggs or even a small hole. This is called an ‘external pip’ (Second picture)
and is the very start to ‘zipping’, aka when the chick rotates inside the egg slowly making it‘s way out to freedom! This process can take as long as 24 hours.


Please allow the chicks to come out on their own at this time and do not attempt to help. Blood vessels that have not dried up or been absorbed yet may still be attached to the shell and chick. Prematurely pulling the shell can cause excessive and sometimes potentially fatal bleeding. A chick can take up to 24 hours to completely hatch although 5 to 7 hours is more common. One thing to keep is mind during this time is the humidity will rise while chicks are coming out of their shells. Do not worry unless it rises above 80 to 85 percent! If this happens try removing some of the water or crack the incubator open just a smidge, but be sure you don’t do this for very long as it can dry out the chicks that are still hatching! This should help bring the humidity down to a safer level. Remove chicks once they’ve fully dried. You can remove the hatched chicks eggs at this time too if you’d like- I always remove the shells when moving babies to make more room and to help so the newly hatched don’t get cut on the possibly sharp shells.


The peeping coming from the newly hatched baby chicks will encourage the unhatched to start the hatching process. When the chicks have all hatched, the temperature can be lowered to 95 degrees Fahrenheit. Once the chicks have dried they can they be moved to the brooder which should already be set up and ready with a temperature between 90 and 95 degrees Fahrenheit. As for any eggs that have not hatched. Candle them and check for any movement inside the egg. Put your ear up to it and listen for any tapping. It’s up to you if you’d like to leave them in an extra day and check again in the morning but try to refrain from leaving them in longer than that. After all the chicks and eggs have been moved plan to thoroughly clean the incubator and store it or set it up for your next hatch! Happy Hatching!🐣


Comments