
Our DIY Projects
- Blue Barn Farm
- Dec 28, 2021
- 5 min read
These projects are by no means done in a professional way, and sometimes not safe😅 but I (Erica) have a creative side and sometimes too many ideas running through my head and these ’projects’ are the outcome.
Duck Coop #1:
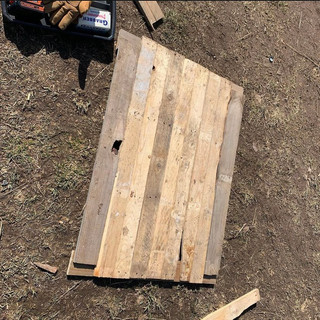
We had bought 3 Pekin's and 3 Khaki Campbells in late Spring 2021 with the intention of breeding them in Spring of 22’. First things first, they needed their own coop. I had the idea to use a smaller but heavy pallet (measuring 2’x3’) as the base, then screwing in pallet boards (disassembled from said pallets) around the outside walls with deck railing bars (wooden) as supports on the inside. It wasn’t much room and I didn’t plan on using it forever. But it made a coop ‘starter’ coop for the ducks to get used to going in on their own. We used hardwire cloth over the two gaps at the top and a roll of roofing shingles on the top. The door was made out of scrap wood we had lying around the farm. Around that we had a 10’x10’ dog kennel. You can imagine the area didn’t stay clean for long🤢 you are correct, it got gross and it got gross quickly!


Duck Coop #2:
This was our second attempt at building a duck coop. By this point we had downsized on ducks and were down to just 3 (2 Khaki Campbells and a Pekin). The coop measured approximately 3’x6’, which was plenty of room for just the 3 ducks we had. The kennel was there for a while to keep the chickens out and away from the ducks so no fights broke out while they were integrated into the flock. The ducks really seemed to enjoy this coop, even trying to go inside of it after we had finally moved them into the main coop by mid October 2021.


Cornish ‘Coop’ #1:
When we brought 30 meat birds home we needed a place to put them that was away from the main flock. At least until they were old enough to get off of heat and be out in their own coop closer to the other birds. Thats where our concrete shack came in! This approximate 14’x14’ concrete with metal roofing shack with two plexiglass windows was the perfect place to put these fat and oh so tasty birds🤤 all that was needed was a door (next pharaghaph).


Concrete Shack Door, now Tack Room Door:
As I’m sure you’ve probably noticed most (if not all) of our projects have been made out of mostly pallets. They are easy to come by, usually free if not very cheap and easy to cut/work with as long as you can get them apart, which has proven to be the hardest part.
Anyway, the doorway did have an old rotted frame still attached to the concrete itself, that wasn’t hard to take off and down to put up its new and improved door (which we later tore down and moved to the tack room to keep the cats out). The door measured approximately 3’x4’ on the bottom and 2’x3’ on the top. The hardest part of the project was making holes for our concrete screws so the door actually stayed on😅 which it didn’t several times after it had been left open on accident. The door was later painted blue (not pictured).


Cornish Coop #2:
This coop was built out of pallets and scrap wood we had lying around. I’m not gonna lie, it’s not a pretty sight but it was the best we could do on short notice. The approximate measurement was 7’L x 7’W x 7’H, as the pallets measured 3.5’ x 3.5’. We didn’t do anything too fancy with this build as it wasn’t going to be up forever- just until these guys would be butchered. After the Cornish got somewhat used to going in at night, we put a fence around their ‘yard’ to keep them in their own area, adding a kennel door panel connecting from their fence to the chicken yard fence, that way we had an easier way of getting in rather than trying and failing to climb over several times a day. After the Cornish were butchered we spent some time planning before tearing down the project and reusing the wood elsewhere.


Guinea Coop:
At one point or another I decided to try my luck at raising Guinea Fowl. Boy what a mistake that was! We went all out on buying the building materials for a decent temporary coop for the 6 we or uh..ahem, I impulse bought🤫 and had them in there for a few weeks before deciding they were WAY too loud for my poor ears to handle and I really didn’t want a noise complaint from the neighbors! They had since went to a home where they already had many existing Guineas and much more experience than I had with that type of bird. I was too scared to let them out with the fear of them not returning. Then we would have noisy birds in our woods that we couldn’t catch! Back to the building aspect- we used plastic pvc panels on the roof (I had put them on the wrong way before realizing my mistake). Part of the ‘coop’ was fenced in with chicken wire, while the door was covered on the bottom panels with 1/2” welded wiring fencing. The kennel door we had bought from our local Tractor Supply and worked well for what we needed it for👍🏻 It kept the birds safe for the many weeks we had them in there.


Main Coop:
This coop is a work in progress. We managed to get the roof on and door (kennel door previously used on guinea coop) and tarps surrounding the outside (temporarily) to keep the wind and snow out. The measurements for this is a little wonky. It’s not the shape or size I planned, it’s like a large rectangle but with a / on one corner instead of a usual right angle, if that makes sense😅 This area for strictly for feed, water and sleeping! The other coop (Turkey coop) is for laying their eggs and for any to sleep in that may want to.


Bantam Coop:
I will say- *we did not build this coop*. We can only assume the people who lived here before us had built it. It’s a bit short inside😅 if you’re taller than 4.5 feet, you’re gonna hit your head! We did make a few adjustments here and there, such as adding pvc roof panels to the sides to keep the cold, wind and rain out while keeping the warmth and dryness in! This coop is located to the left of the barn, closer to the woods. When we moved in we originally put all our birds in this coop, and since we had less than a dozen at the time, this coop was perfect. We have since moved all the birds out except the bantams- hence the bantam coop!


Old Main Coop now Nesting Coop:
This coop has been put up and taken down more times than I can count. I originally bought it half off from Tractor Supply in September of 2019 (originally $500). It’s not built the best, and the roof started to cave in this winter 2021, which is now being supported by an old fence post😅 The third picture and fifth picture show two different nesting box type builds. They aren’t perfect, but the last picture is the current build. I don’t plan on keeping it like that! Stay tuned for a more permanent nesting box set up!


Comments